Saturday, March 5, 2016

Babies on the Beach

Well I just posted about our kitchen backsplash update.  That was a recent project we finished, but now I'm going to jump waaaay back to last summer (yes, this is how far behind I am).  We went to the beach with our good friends, Jenny and Jakob, and their adorable daughter, Avery.  Avery was about 10 months on this trip, and Hannah had just turned 2.  Weston and I have taken several trips with Jenny and Jakob, but this marked the first trip with kids.

We met our friends down at the beach, but Weston and I rented a minivan so that we could all caravan around together while we were down there.  And y'all.  We loved that minivan.  Automatic sliding doors are the greatest invention ever.  But are we minivan people??  Surely not.  My old college roommates predicted I am.  Time will tell how well they know me. :)


Getting back on subject, we had a fantastic time at Santa Rosa Beach located on 30A between Seaside and Sandestin.  Not many places on 30A are beach front, and we love this little complex.  It was our second time staying there.  It was ground level with a flat grassy area for the kids to play right off the patio.

We spent our trip on beach and eating delicious dinners just the way we like to vacation.  After the kids went to sleep, we spent our evenings on the patio with a drink in hand talking about life with our friends while we listened to the waves crash in behind us.


We found a couple new fantastic restaurants.  There is one just over the bay bridge with delicious sushi with this waterfront beach area.  We snapped a few pictures after dinner.


Our favorite family selfie to date.


We had to put the girls in matching dresses one night.


The outtakes:

Honk

Have you ever run quickly to a baby's aid stuck on their back in the sand??  Warning, you may kick sand in their poor face.  This may or may not have happened.


There was a lot of jumping and squealing at the ocean.  This beach trip marked the transition into really having fun in the sand for Hannah.


Avery really liked the beach too for being as young as she was when we went.  She even napped twice on the beach!


Coordinating swimsuits thanks to Jenny's Mom.  Thanks Sharon!


We love this little place of paradise, and we're so thankful our friends agreed to join us.  It was definitely not like our trips before babies, but it was exhausting and fun.  I'll cherish this trip always.

Friday, February 26, 2016

New Marble Backsplash

Our kitchen has never been a favorite room in our house for me, but it is quickly jumping the ranks after our latest project.  Our old backsplash made a statement in our kitchen, but I didn't like what it was saying.  It felt dated to me, and a little more of a country feel than I prefer.


My dream kitchen would have white, shaker cabinets, marble backsplash, and a farmhouse sink.  With just changing the backsplash, I really get the feel that I love in a kitchen.

So our first step was to pick the tile.  We ended up going to the Tile Shop.  They have all the tile you can imagine, and they can usually get it within a week for you.  Oh the dozens of choices of different types of marble and sizes and finishes we had to choose among.  We picked the polished tempesta marble, but they ordered the tumbled...womp, womp.  They were quick to fix the mistake, and I'm just thankful I peeked in the boxes before we were ready to begin the project.

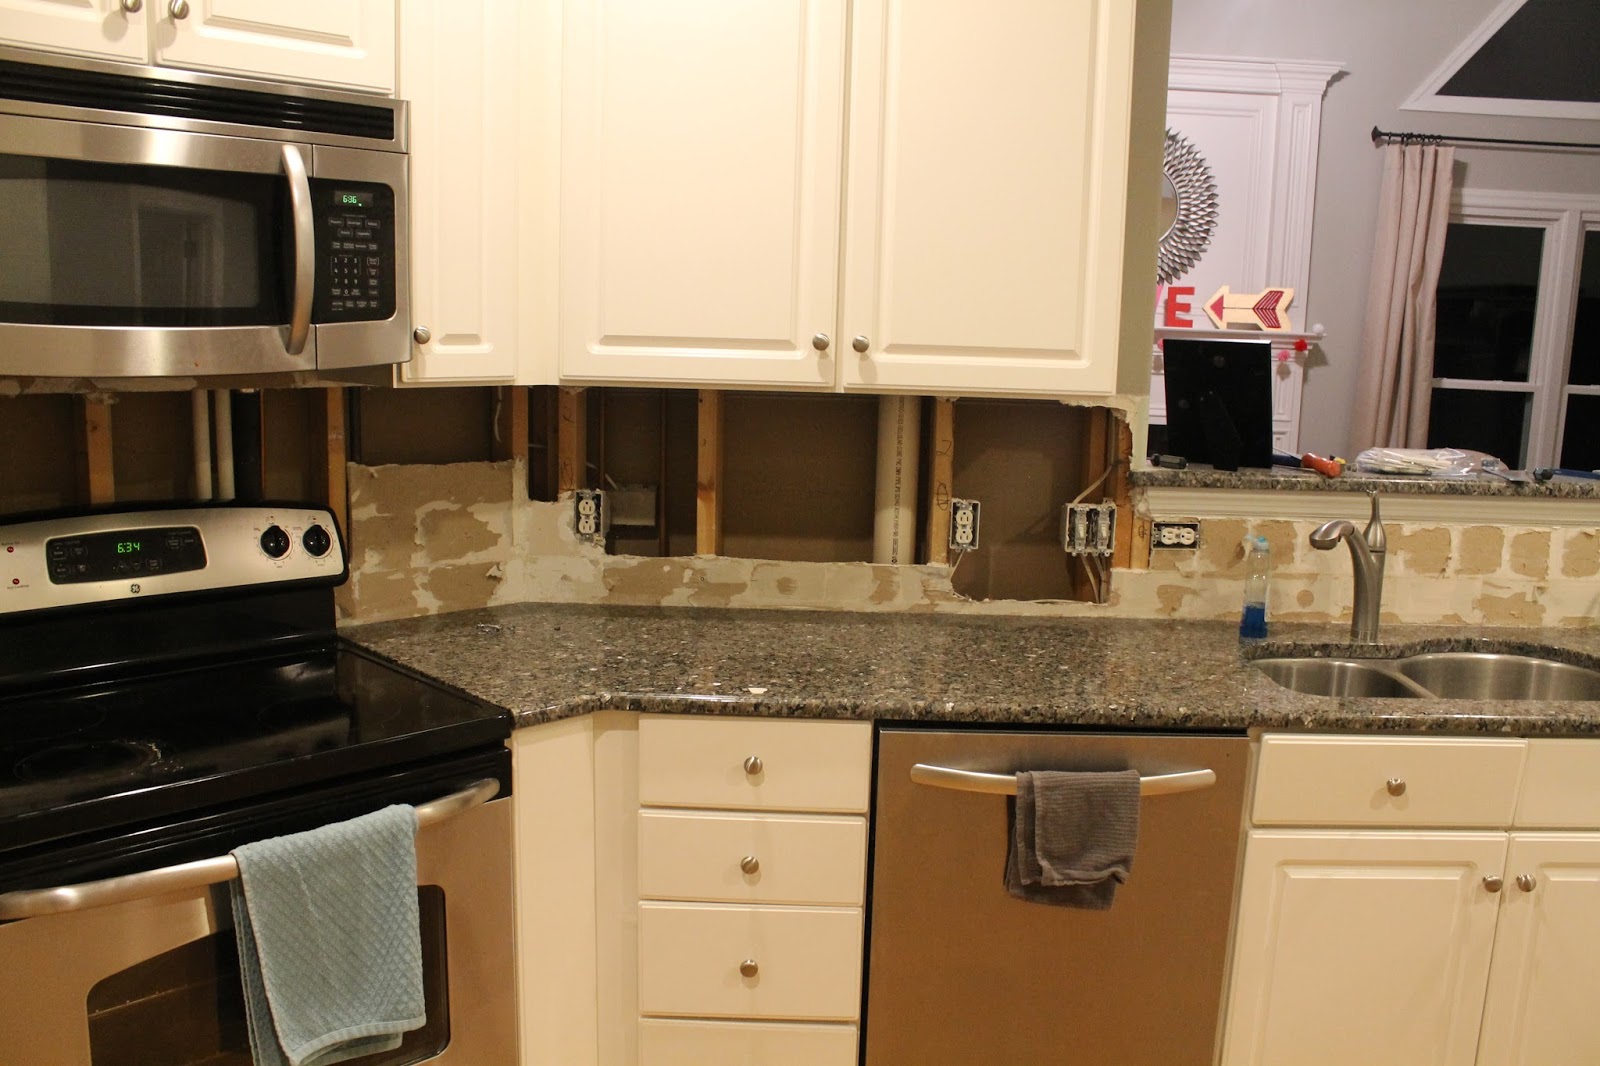
So before we could start slapping up our new tile, we had to take down our old.  Our biggest mistake would be demo.  We wasted so much time and energy had we known then what we know now.  The original tile had a mesh back to it, and they weren't coming down easily without damaging our drywall.  We tried to salvage as much of the drywall as possible, and this demo cost Weston almost 6 hours of his time.  And even then, we ended up with an odd patchwork wall.


With all of the electrical boxes and the strange cut outs, it was difficult to put in new drywall that patched in perfectly.  We wasted another 3 hours cutting drywall for this before we decided to rip everything out and just put up all new drywall.  This was our best idea yet, but we wished we had known this 9 labor hours earlier.


Another hour or two later, our walls were ready for our tiling that next weekend!


So we chose a small subway style tile.  These came in mesh 12"x12" squares.  It was a little bit of a pain around the 11 electrical boxes we had to tile around.  However, overall, tiling went very smooth.  We laid out all our boxes of tile to choose our favorite sheets and mixed up the coloring of tile between boxes.  We didn't want one wall to look more tan and then another wall look gray or blue.


 Then we mixed our mortar to the prescribed "toothpaste" consistency, and we went to town.  Weston and I each had our jobs.  Weston did all the cuts on the wet saw.  He was also in charge of the spacers between the tiles.  I was in charge of spreading the mortar and putting up the tiles.  And a special shoutout and thank you to NuNu for watching Hannah for the two days we worked on it.


This was our progress after day 1.  We worked 11am to 2 am.  We ate lunch standing up and only stopped for a dinner break.


The next day we just had a small wall by the fridge to complete.  It only took us a couple hours to finish, and then we had to wait 24 hours to take out our spacers.  Hannah loved this job!  I love how Weston is wearing a Sofia the First necklace.


After the spacers came out, we grouted.  We went with a white, unsanded grout.  We had read that sanded grout can scratch your marble.  We used an admixture in the grout to prevent shrinkage with the unsanded grout.  I did the grouting which requires some serious forearm strength, and Weston mixed our grout batches and rinsed our sponges between wiping.  You don't want your sponge too wet, and he could ring them out really well.  After the grout, you need to wait a couple days, and then you can seal your tiles.  During that waiting time to seal, you can caulk between your tile and countertop.  You don't want to grout in this area.  Here are a few before and afters.

Before:


After:

Before:


After:


Before:


After:


My new view to greet me when I walk in through my garage.  It makes me happy every time.


I'm really happy with the way it turned out.  I think it lightens and updates our kitchen to the look I love.  I'm also thankful for a husband willing to spend his vacation week doing something like this.  Thanks for letting me share! :)

Sunday, January 24, 2016

Mint and Coral Kid's Bathroom

I love the updates we've made upstairs to Hannah's bathroom.  This is our upstairs hall bathroom and will most likely be the bathroom for any future kiddos.  I wanted to be able to easily transition it to a gender neutral bathroom in the future if needed by adding navy towels and different artwork.  I love the coral and mint color combination.  It's definitely a popular color choice these days in a lot of designs.


A little reminder of the before in our upstairs bathroom:


And the after:


First up, we painted all the trim in this room Benjamin Moore Simply White.  With three doorways, this was a big job for such a little space.  Also, you can tell the doors are different colors than the trim.  Someday, I will invest in a decent paint sprayer, and I can paint all the interior doors to match our trim.  For the walls, I went with Benjamin Moore Palladian Blue.  This was the color I used down in our laundry room, and I was able to get the whole bathroom painted with what we had leftover in our can.

Trim and Paint Before:


Trim and Paint After:


Before we were able to paint the walls though, we had to take down the builder grade mirror.  Weston did great and got it off in one piece.  Then Weston and my Dad took down the big light bar, and they installed two lights over each of our new mirrors.  Unfortunately, this required a few cuts into our wall because the wiring was strung across the wall rather than up to the attic then over to the switch.  It really wasn't difficult to patch it, and I already had to do the patch for the original light in the center.  This is what it all looked like before the drywall repair.


After I screwed our drywall patches back into place, I used drywall tape around each edge.


Followed by mudding over the tape and drywall screws.


Then it was sanding and painting the whole bathroom, and you would never know we had all those holes in our wall.  


I love the schoolhouse style globes on the lights.  I think it's a perfect look for a youthful kid's bathroom.  The lights came from Lowe's online, and they weren't available in the store.  The mirrors are from Pottery Barn, and I think they are really nice, quality mirrors.  I definitely recommend them!


There isn't a wall large enough for a towel bar without looking silly.  So I added two towel hooks I picked up from Home Depot.  The light pink towels are from JCPenney, and the coral color towels are from Target.  If we ever have a little boy, I think navy blue towels could easily be added into this color combo.


I went with a neutral extra tall shower curtain from Bed Bath and Beyond.  I always recommend tall shower curtains because it makes your bathroom feel larger by raising the eye.  The shower hooks were from Target, and I love the little flowers on them.


I added towel rings next to each sink after the oversized towel bars were removed, and the prints are from Minted.com that I framed myself.


The two navy cloverleaf bath mats were from Pottery Barn Teen.  I really like them, but my only complaint is they are a couple inches smaller than what they advertise on the item description online.  They're still good sized, but I had measured for something a little larger.


I loved this print from Hobby Lobby.


And another favorite update to the bathroom would be our linen closet.  The first time we walked through the house, I knew I wanted to change the shelving in the attached linen closet.

Before of the linen closet:

It was a complete wasted of space in our triangular shaped closet.  The towels wouldn't even fit on those tiny shelves.  They were only around 10" deep.


So we took it down and added our braces, making sure to hit the studs.


Followed by adding our boards that we cut to the shape of our closet with a little geometry work.


We finished it off with a little trim, and I love that we've probably doubled our storage space in that closet.

After linen closet:


So that's how we updated our upstairs bathroom into something fun and pretty for our daughter.